Sunday, July 29, 2012

Hot Pepper Paste

The growing season is in full gear and the two hot pepper plants are producing more peppers than I know what to do with.  I don't want to waste a single one, so I thought why not try to make pepper paste and freeze it. 

Here's what I did:


  1. Rinse the peppers thoroughly and let air dry (or dry with a cloth)
  2. Snap the top of the pepper off (the stem)
  3. Place all peppers in the food processor
  4. Pulse until peppers are finely minced
  5. Add olive oil to get the desired consistency
  6. Drop onto a cookie sheet covered in wax paper with a 1/2 teaspoon
  7. Freeze for a couple of hours 
  8. Remove from the waxed paper and place in a freezer safe container


These peppers have proven to be excellent in tofu tacos, rice and beans, I have even used them to kick up the spice in my taco salad.   The pepper paste will be good in the freezer for 6-8 months in an air tight freezer safe container.  I plan on using the paste in the cooler months to heat up my dishes a bit.  

Wednesday, July 25, 2012

Living Room Makeover


After the kitchen remodeling was done, we gave ourselves a few weeks to enjoy the house without breaking out any paint brushes.  Still, the living room was begging for attention. It's the first room you walk into from the front door, and we wanted something fun, energetic and warm.  After scouring through design books, image searches on Google, Pinterest, and some decorating magazines, we decided to take the plunge and go bold with red. "Forbidden Red" from Behr was the choice for it's deep, rich tones that stopped short of being too candy apple red.  

Rather than rip down the wood paneling which had (you guessed it) WALLPAPER underneath, we opted to simply use the paneling as texture.  The truth is, when freshly painted, the grooves of the panels add an extra hint of charm to the room.  What did come down however, was all of that old brown molding.  This stuff was thin and just plain unattractive.  Similar to the kitchen, we used a borrowed air compressor and nail gun to add crown molding (thanks Joe!).  To eliminate the need for tedious mitering cuts, we found a great alternative called "interior corner blocks".  The molding simply meets the blocks in the corners to add a nice architectural element.  


We still had a lot of bare wall space, so we chose to hang a photo grouping of my scenic images. Rather than color images competing with red paint, I converted all 5 images to B&W in Photoshop. I had them printed at adoramapix.com who always does a terrific job at a great price.  The basic layout was also worked out in Photoshop to get an idea of how they would all look together. We did all of the matting and framing ourselves with supplies from AC Moore.  The total cost of the finished artwork was just under $100!  

We are so happy with the way this room was transformed.  It went from an outdated, cluttered space to a comfortable respite to watch a movie, play scrabble, or enjoy wine and conversation with friends.  

Monday, July 23, 2012

Summer Sage Iced Tea

When we planted herbs like sage, thyme, and rosemary, I thought they would strictly be for cooking purposes. However, after researching their medicinal benefits, I was enlightened to all of the other uses, particularly in herbal tea.  With recent temperatures hovering around 100 degrees, this cold iced tea has been quite a refreshing treat.

Serving size: 5

Ingredients: 
5 cups water
10 dried sage leaves
1 tablespoon dried raspberry leaves
1 shoot of dried lemongrass
A sprinkle of dried thyme leaves
3 teaspoons of honey (from a local farm if possible)

Directions: Bring water to a light boil and add sage, raspberry, thyme and lemongrass. Add the honey and stir to make sure honey doesn't settle at bottom of pot. Lower heat to simmer and allow to steep for 10 minutes before straining tea into container while removing leaves.

Enjoy!

Friday, July 20, 2012

Lavender Water

We love everything about lavender water except for the unnecessarily high price tag.  Still, we wanted to enjoy the soothing scent of this beautiful flower on our laundry and linens.  We decided to make it ourselves with ingredients that can largely be found at a local supermarket.

Ingredients

Distilled Water - $1
Rubbing Alcohol - $1
Ribbon - $1
Spray bottle - $1
Lavender Oil - $10
Total cost $14 


Directions

Add all ingredients below into an empty spray bottle (we found ours at a dollar store).

3/4 teaspoon of lavender oil
2 tablespoons of rubbing alcohol
2 and 1/4 cups of distilled water

Shake vigorously to mix together.

With the leftover supplies, you should be able to make another 2 bottles of this. 

Sue made a beautiful bow to complete this easy project.  Enjoy!


Wednesday, July 18, 2012

Taco Salad


Salad is a great dinner option for those of us that don't eat meat, but this healthy meal can easily be turned hearty with a few additions.  Just like any good salad, the base of the dish is leafy greens.

This year we grew three types of lettuce in our garden for variety and flavor.  I planted leafy green seedlings, two butter leaf lettuce plants and two green leaf lettuce plants that were purchased from the local garden shop.  I selected the species of lettuce that are good for harvesting individual leaves instead of the entire head of lettuce.  This option allows for continual harvesting for most of the season.  Chris & I love the garden lettuce so much that when the spinach plants were past harvest, I planted a late crop of mixed lettuce seeds in their place.  In New York, lettuce can be grown well into September and possibly October depending on the weather.

Once you have selected your favorite type of lettuce its time to prepare the rest of the salad fixings.

Servings: 4 
Salad Ingredients
Black Olives (sliced)
1/4 cup diced red onion
1 cup diced tomatoes
14 ounces of black beans, pinto beans, or vegetarian re-fried beans
Whole grain tortilla chips (or your favorite variety)
2 cups of shredded lettuce
1 avocado cubed

Dressing Ingredients
Juice of 1 medium lime
1 tsp chili powder
1 crushed garlic clove
1 tsp sea salt
1/2 tsp ground black pepper
1/2 cup extra virgin olive oil


Directions


For Dressing
In a small bowl combine the lime juice, chili powder, garlic, salt and pepper and stir.  Slowly whisk in the olive oil to emulsify the dressing.  This will allow the lime juice and oil to combine in a smooth dressing.  Let the flavors combine for about 10 minutes then whisk again.  While you let the dressing set, start on the rest of the salad.
Chili Lime Vinaigrette 


For Salad
In a medium bowl combine the black olives, onion, and diced tomatoes, mix well.  Add the dressing to the mixture and stir.  Let the salad ingredients marinate for at least 20 minutes stirring occasionally.  You can let the mixture sit for up to 1 hour and refrigerate, this will bring the juices of the tomatoes out and the flavors will combine nicely.


Once your salad mixture is done marinating heat the beans to cook them.  While the beans are cooking, create a border on the plate with tortilla chips.  In the center of the chip border place 1/4 of the shredded lettuce.  Spoon beans around the edge of the lettuce.  Spoon 1/4 of the salad mixture onto the lettuce bed.  Add diced avocado to the top of the salad.


Tuesday, July 17, 2012

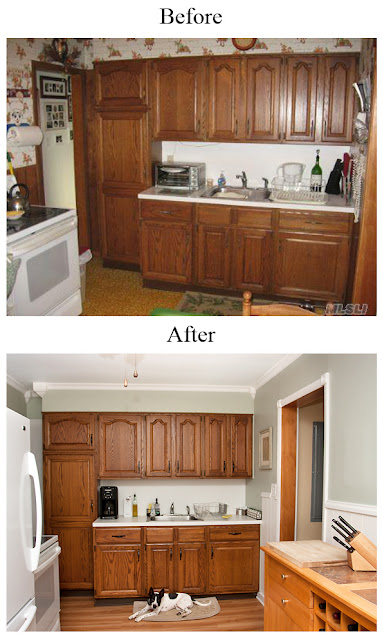
Kitchen Transformation

With keys in hand the morning after we closed on the house, I began the dreaded process of wallpaper removal. Armed with DIF gel, a paper scorer, scrapers, the goal was to eradicate all 4 layers of old wallpaper dating back to 1952. The top layer came off very easily by simply pulling it down. The next three however, were hellish. Thankfully Sue's sister came over and helped or I think I'd still be scraping.  It was no simple task and using harsh chemicals was not a joy, but the volume of wallpaper and the age of the material made it a necessary evil.  Despite the heavy duty chemicals and wide array of tools, the paper was resilient, and we were left to scrape every square inch. It took an entire 12 hour day that was not without its fair share of surprises. 


Once all of the paper was removed we were left with raw walls that were beaten and bruised. Under the layers, we found holes, cracks, a boarded up window, and an old  disconnected fusebox. The next day was dedicated to fixing those issues with new pieces of drywall, patching tape, spackle, and even an electric sander. This sander by the way, is awesome and made the job a lot easier. Of course it also left a thick layer of sawdust all over the house, even some on the puppy.


After a night of rest, take-out Chinese food, and some fresh air, it was finally time to paint! We wanted a sage and white combination which is very calming and green is Sue's favorite color.  First, we needed to seal the walls.


The first layer was done with an oil based primer called Killz. This was recommended as a sealer since the wall was so fibrous.  The stuff smelled a bit, but not as noxious as I expected. It went on thick like glue and really covered the drywall nicely. Suddenly, it was starting to look like a wall. After this dried for about 24 hours, we used the Behr paint and primer combo for the ceiling, wainscoting, and walls. The wainscoting took at least 4 layers, but finally covered beautifully. The ceiling just required two coats, and the walls got one coat since they had already been primed with Killz. Now the entire room was stark white. 


After this dried thoroughly, we painted the previously wallpapered areas with a light sage from Behr called Sliced Cucumber. It went on well, but did require two coats. The room was starting to take shape the way we envisioned. I cleaned up and moved all the appliances back. I also changed the light switch covers, the light bulbs, and all of the cabinet handles.  Sue added a curtain to the window and removed the horrible, yellowing vinyl pull-down. What a difference! 


A few weeks later we said goodbye to the horrible yellow/orange vinyl linoleum floor, and replaced it with Allure Ultra laminate.  We also tore down all of the old brown strips of molding and added white crown molding with corner blocks to add some different architectural elements.  The entire process took several weeks, but by doing all of the work ourselves, we saved a substantial amount of money that went into the living room remodel. That's a different story for a different post however.  For now, here's a before and after photo of our new kitchen.


Sunday, July 15, 2012

Vegan Pesto

Chris and I planted three sweet basil plants this year in our garden.  Initially, I had started all three out as seedlings, but only one survived.  So to replace the lost two we purchased plants from our local garden store (at about $3 each).  I am proud to say the surviving seedling is doing just as well as the hearty plants we purchased later in the season and all three bushes have produced an over abundance of aromatic leaves.


In June, we harvested small amounts of larger leaves for our nightly recipes.  However, with the hot July sun, we quickly found ourselves overwhelmed with basil bushes nearing 3 feet tall.  What to do with all this basil?  


PESTO!  Cheese free of course, since both Chris & I don't consume dairy products.


1/2 of the harvested basil from our garden. 

I didn't want to harm the remaining plant and hinder new growth, so I cut the basil stalks with precision.  I carefully snipped just above the node of new leaves on the stem.  This will allow the remaining plant to mature to full foliage.  Since we had so much basil to harvest, the bushes were still full enough to survive.  

Chris picked through the leaves pulling out any wilted parts.  After rinsing with cold water and allowing to air dry, the basil was ready for pesto! 


Vegan Pesto Recipe


Serving size: 1/2 pint, recipe makes 4 servings


Tools
Food Processor (or blender)
Sharp knife
measuring cup and spoons


Ingredients
1/4 cup pine nuts
3 cloves of garlic
4-5 cups of fresh basil leaves (stems removed)
1/4 - 1/2 cup Extra Virgin Olive Oil
1 1/2 teaspoons of sea salt
1/2 teaspoon fresh ground pepper
1 package of firm tofu (drained & cubed)


Directions
In a food processor, pulse the pine nuts until crumbled.  Be careful not to process too long as the nuts will turn to a paste that is not desirable for this recipe. Once processed, set the nuts aside in a small dish. 


Pulse the garlic until minced.  In handfuls, add the basil to the garlic until the basil is minced.  Slowly incorporate 1/2 of the oil as you work in the basil.  Once all of the basil is processed, slowly add cubes of tofu one handful at a time.  Mix in the remaining olive oil.  If the mixture  is too thick add a small amount of olive oil until desired texture is reached.  


Transfer the processed mixture to a large bowl.  Fold in the pine nuts, salt and pepper.  Cover with plastic wrap and refrigerate for at least 30 minutes.  


If you are using the pesto right away, cook the pasta according to package directions and then add pesto.


We froze half of the pesto to enjoy later in the year.  To safely freeze the sauce, we used a 1 pint mason jar. After adding the mixture, make sure to tap the container on a solid surface, this will bring any air bubbles to the surface.  Leave some headroom at the top of the jar if you plan on freezing it to allow for expansion.